Skip to content
Rear Camera for the Dash Cam Installation Complete Guide in Less than 30 minutes

Rear Camera for the Dash Cam Installation Complete Guide in Less than 30 minutes

In-depth Guide to Installing a Dual Front and Rear Dash Cam: Wiring Inside Your Car

Preface

Nowadays, a dash cam is virtually an indispensable companion in a car. However, most users hesitate to install the rear camera of a dash cam either because they're unsure how to do it or due to the expensive installation fees charged by some shops. But wait! Don't be discouraged and give up on installing a rear camera! In many cases, the importance of a rear camera can even surpass that of the front one. After all, a significant number of accidents involve rear-end collisions. In such scenarios, having a dash cam with a rear-view function is crucial!

No more worries! 😁 Here comes the Team UltraDash with a comprehensive guide to installing the rear camera. Let us show you how to install the UltraDash R1 2K rear camera (IP67 waterproof). Believe it or not, the process is simpler than you might think! With a little courage and a DIY spirit, installing a rear camera can be a breeze. Most of the task involves wire management, and there aren't many interior panels to remove. You can probably finish the installation within 30 minutes, saving a good chunk of money on installation fees😏. Let's dive in!

Note: This installation involves some technical steps. If you lack the necessary tools or confidence, it's recommended to consult a trustworthy local auto accessories shop, car audio specialist, or vehicle maintenance provider for assistance. You can provide them with this guide to inquire about the cost of installation. We don't have any affiliated installation partners, so consider checking reviews of potential installers before proceeding.

The following installation guide uses the 2020 Toyota Corolla Sport (hatchback model) and the UltraDash Z3+ standard dual-camera dash cam as an example. Owners of Toyota Yaris Cross, 12th-gen Toyota Corolla Altis, Toyota Corolla Cross, and 5th-gen Toyota RAV4 can also refer to this guide. This article is also applicable to the UltraDash Z3+ commercial edition designed for uber drivers and the UltraDash S3 4K ultra-high-resolution dash cam.

Pre-installation Preparation

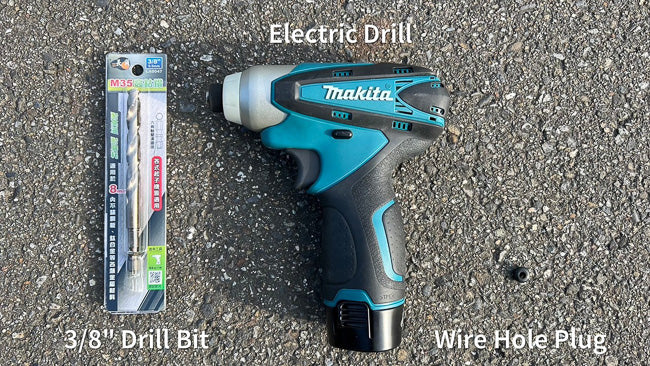
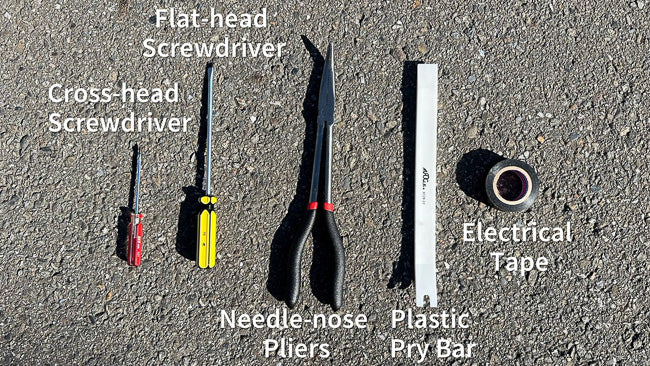
Phillips screwdriver / Flathead screwdriver / Needle-nose pliers / Plastic pry tool / Electrical tape / 3/8" drill bit / Electric drill / Grommet (5mm inner diameter)
1_Tool_Intro
2_Tool_Intro

Installation Process

Step 1: Start by sticking the rear camera to your chosen location on the rear windshield.
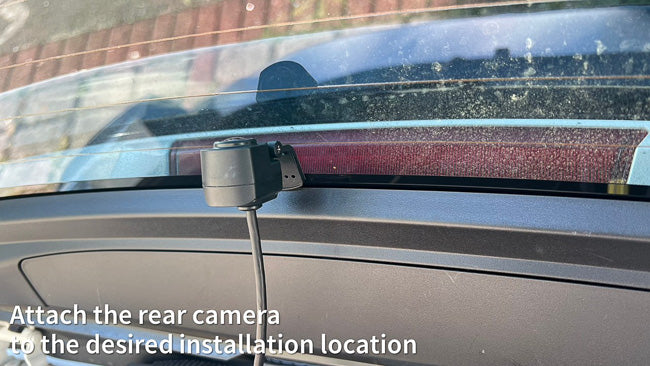
3_Attach_Rear_Camera

Step 2: Connect the rear camera to the dash cam and verify if the camera's recording angle and position are appropriate.

4_Connect_Rear_Camera

Step 3: After verifying the rear camera view, use a Phillips screwdriver to tighten the screws on the camera bracket to fix its angle.
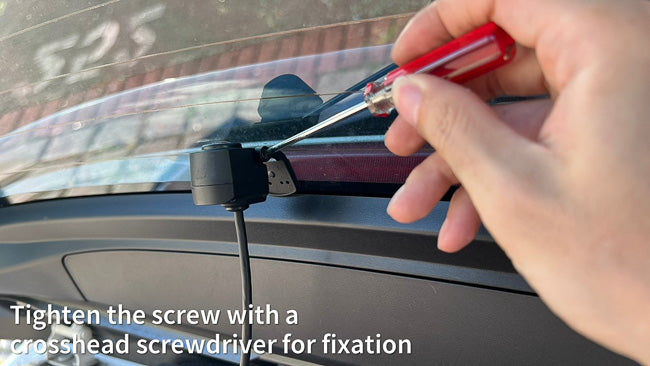
5_Tighten_Screws

Step 4: Remove the waterproof strip on the passenger side, as illustrated. Start from the marked position to more easily remove the waterproof strip.
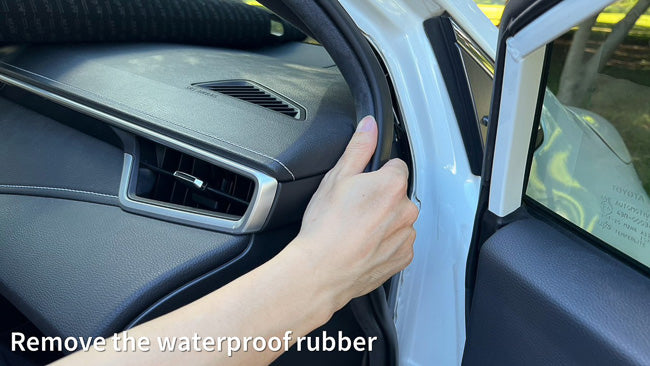
6_Remove_Waterproof_Tape

Step 5: With the waterproof rubber removed, take off the plastic trim on the A-pillar. Position your hand in the gap and apply some force. Pay attention to the clips inside, and use needle-nose pliers to remove them.
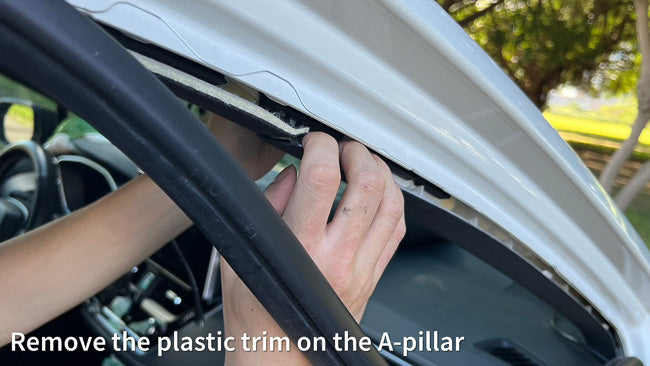
7_Remove_A-Pillar Trim

Step 6: Route the rear camera cable beneath the side curtain airbag. Ensure this is done in a way that does not interfere with the airbag deployment. This is crucial for safety!
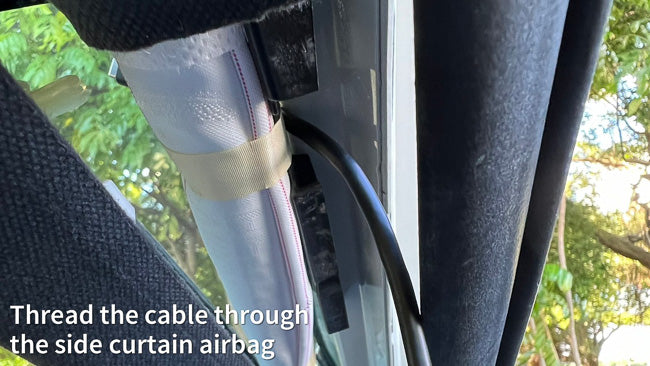
8_Thread_Wires_Airbag

Step 7: Connect the rear camera cable to the device. This makes it easier to gauge the length of the cable. Then hide the cable inside the ceiling trim, following the edges toward the A-pillar.
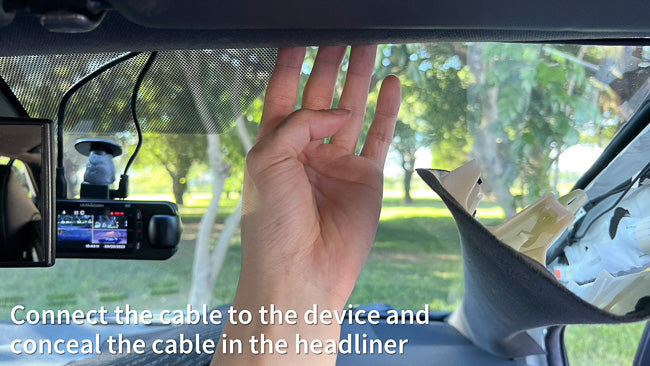
9_Conceal_Wires_Headliner

Step 8: Once the cable reaches the A-pillar and is in the right position, reattach the A-pillar trim, securing the rear camera cable.
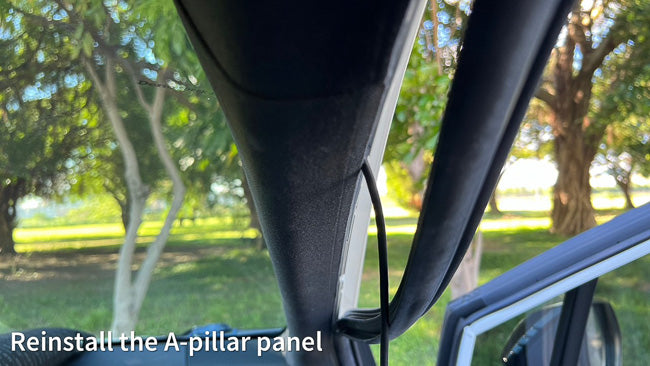
10_Reinstall_A-Pillar Trim

Step 9: Continue hiding the cable along the edge of the A-pillar.
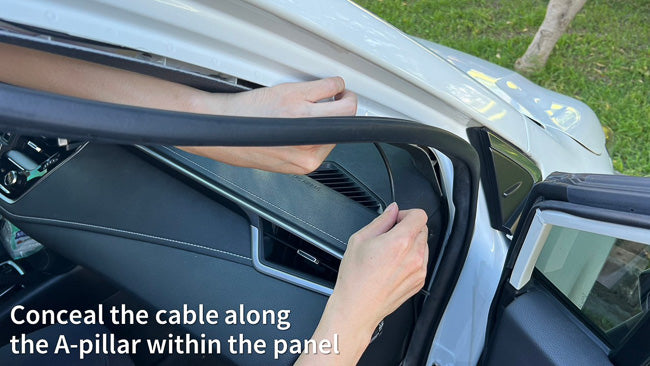
11_Conceal_Wires_Along_A-Pillar

Step 10: After routing the cable inside the trim of the A-pillar, reinstall the waterproof rubber strip. Press back and forth to ensure the waterproof rubber is securely in place.
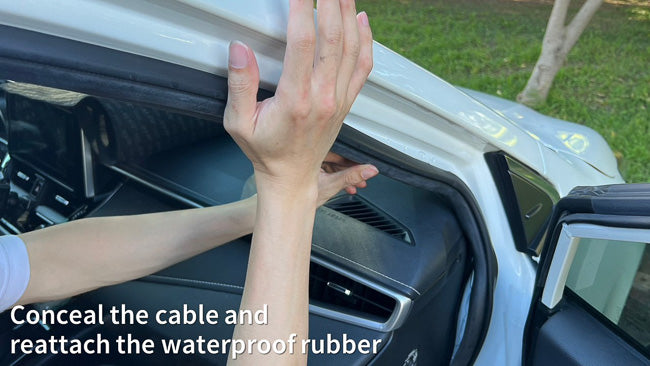
12_Reattach_Waterproof_Tape

Step 11: Continue routing the cable along the edges toward the carpet.
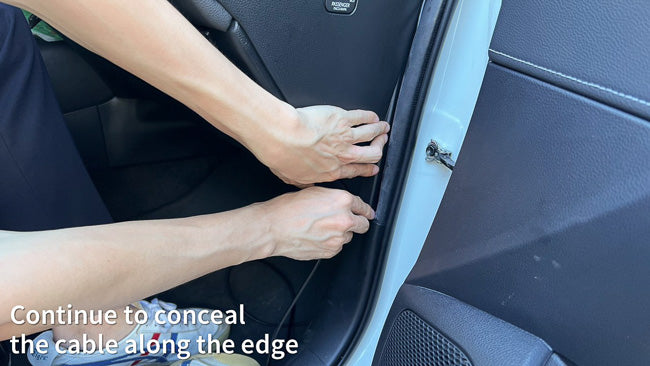
13_Continue_Concealing_Wires

Step 12: At bends, use the gaps in the trim to hide the rear camera cable inside.
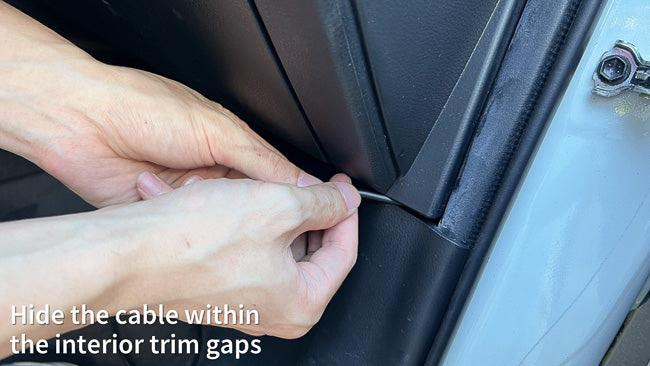
14_Hide_Wires_Interior_Gaps

Step 13: Position the rear camera cable behind the carpet, and hide it using the edge trim.

15_Tuck_Wires_Behind_Carpet

Step 14: Keep routing the rear camera cable along the edge trim. If the gap isn't big enough, use a prying tool to create space.
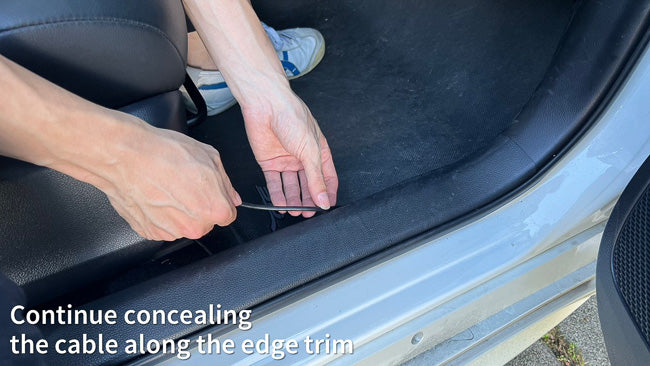
16_Continue_Concealing_Wires

Step 15: Continue hiding the cable in the trim towards the back seat.
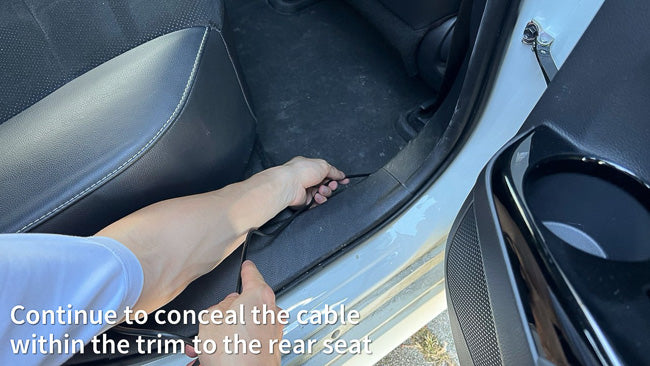
17_Conceal_Wires_to_Rear_Seat

Step 16: Route the rear camera cable into the gap between the back seat and the trim.
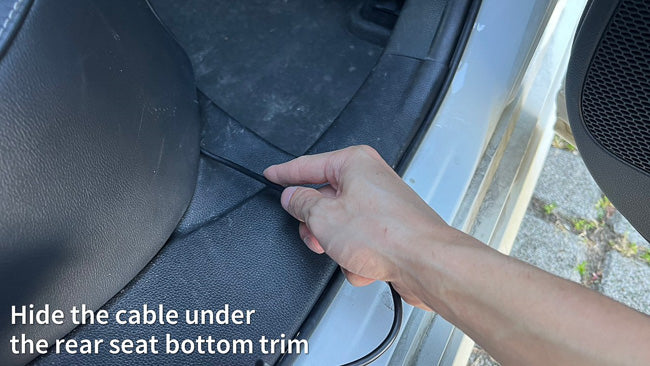
18_Hide_Wires_Under_Rear_Seat

Step 17: The trim here is tighter. Use a prying tool to create space and hide the cable inside.
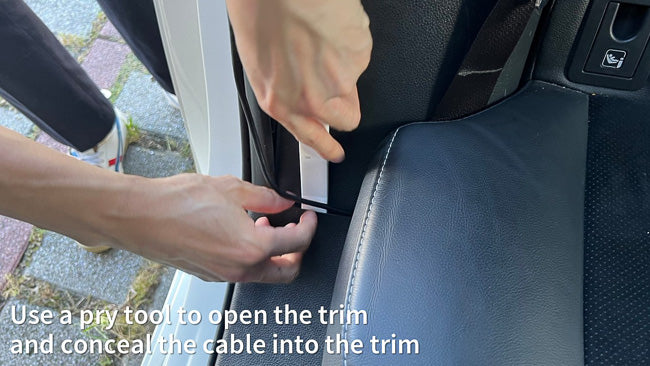
19_Pry_Open_Trim

Step 18: Again, remove the waterproof strip. It's easier to start from the side. Once removed, route the rear camera cable inside the gap.
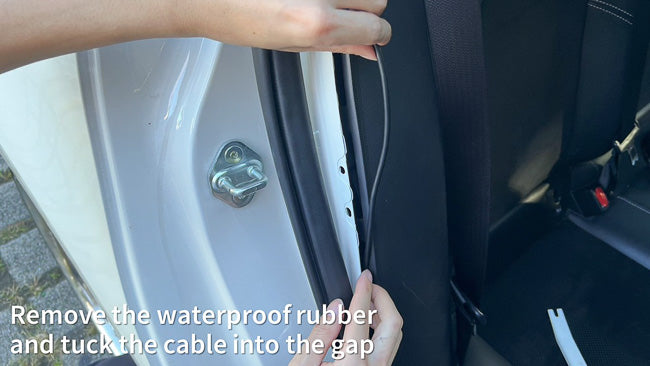
20_Remove_Waterproof_Tape

Step 19: After hiding the cable, reinstall the waterproof rubber.

21_Reattach_Waterproof_Tape

Step 20: The corner near the rear wheel trim has a bigger space. It's recommended to hide any excess cable here.

22_Conceal_Excess_Wires

Step 21: As you'll need to hide part of the cable inside the car's ceiling, first remove the ceiling clips. These clips have a two-part structure. Use a flathead screwdriver to pull the clip down before removing it. There are three clips in total.
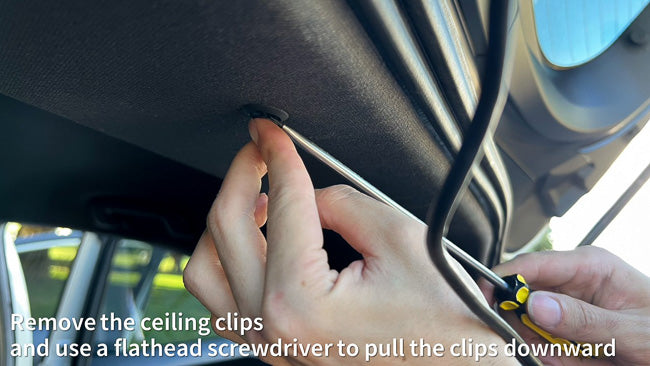
23_Remove_Headliner_Fastener

Step 22: After pulling out the clip, use a prying tool to remove the entire clip.
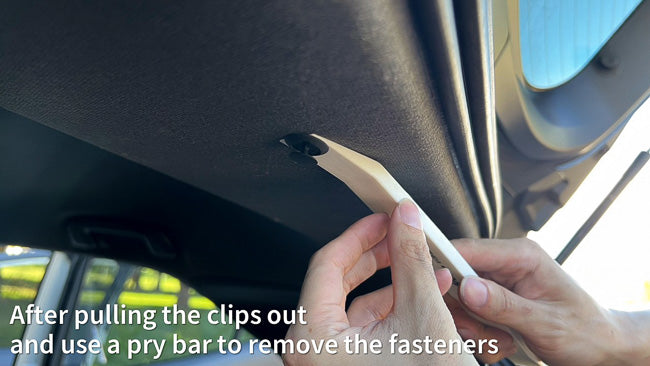
24_Pry_Open_Door_Panel

Step 23: Remove the door's waterproof rubber and route the rear camera cable inside the ceiling trim.
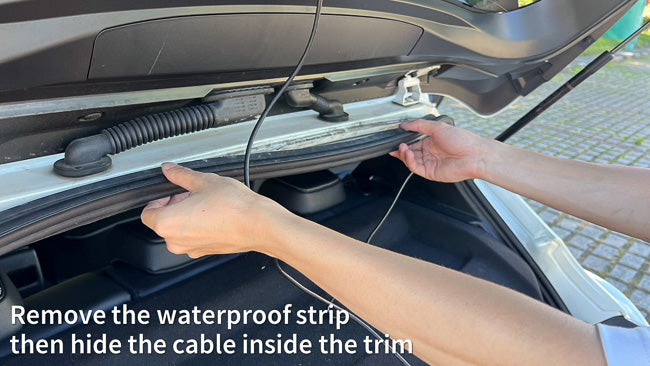
25_Remove_Waterproof_Tape

Step 24: Before drilling a hole in this trim cover, use a prying tool to open it and confirm the drilling position.
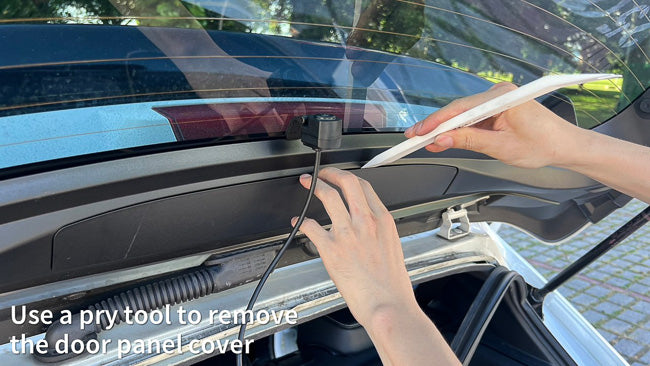
26_Pry_Open_Door_Panel_Cover

Step 25: Once you've chosen the rear camera cable's exit position, drill a hole in the trim cover. Be cautious not to damage any existing cables.
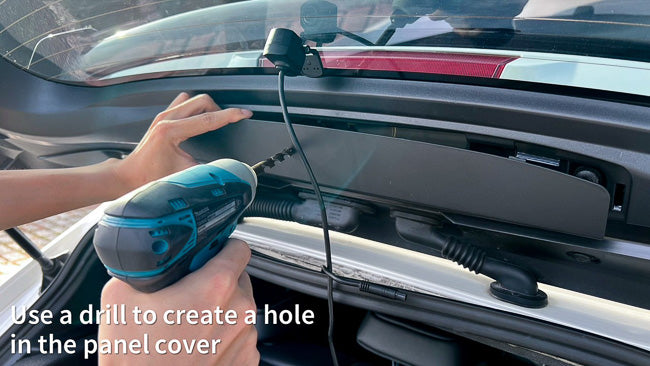
27_Drill_Hole_Panel_Cover

Step 26: Insert the grommet into the rear camera cable. The grommet's inner diameter is only 5mm, smaller than the cable's 9mm diameter, making it a tight fit. Ensure the grommet is made of rubber for elasticity.

28_Insert_Wire_Hole_Plug

Step 27: Install the rear camera cable and grommet in the drilled hole.
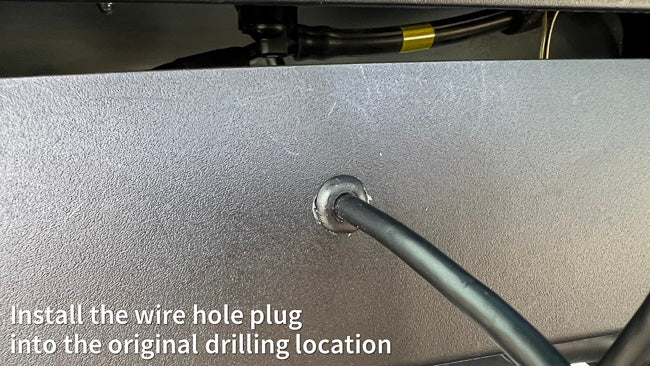
29_Install_Wire_Hole_Plug

Step 28: Pass the rear camera cable through the rubber conduit above the rear door. As illustrated, use your right hand to guide the cable downwards and your left hand to press on the conduit, pushing the cable through until it reaches the car's ceiling.
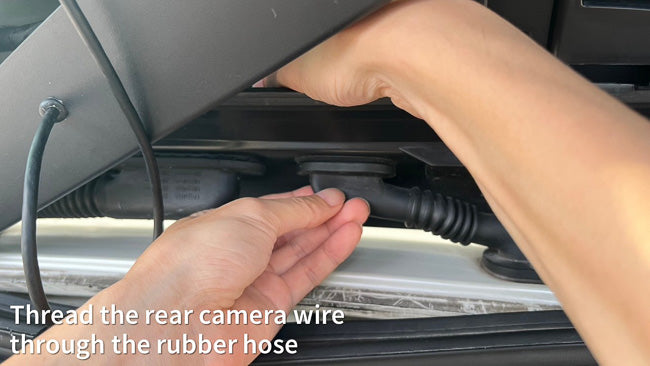
30_Thread_Wire_Rubber_Hose

Step 29: Connect the rear camera extension cable to the cable you just routed. Make sure it's securely connected.
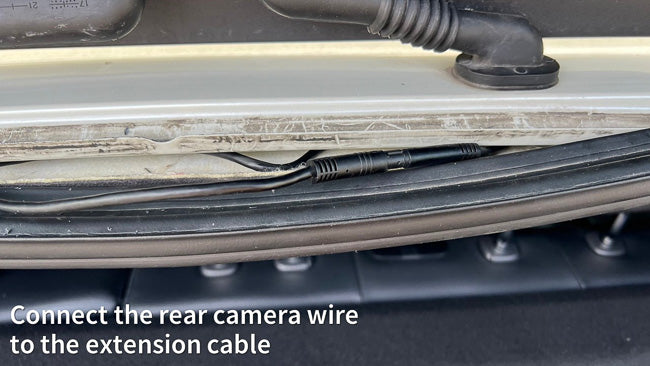
31_Connect_Rear_Camera_Wire

Step 30: To enhance the connection's stability, wrap the junction with electrical tape.
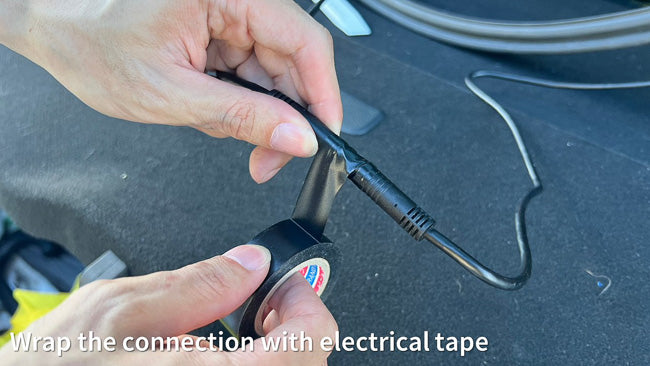
32_Wrap_Connection_Electrical_Tape

Step 31: Finish by hiding the cable back into the car's roof, and arrange any excess cable in the rear door trim. Reattach the trim cover.
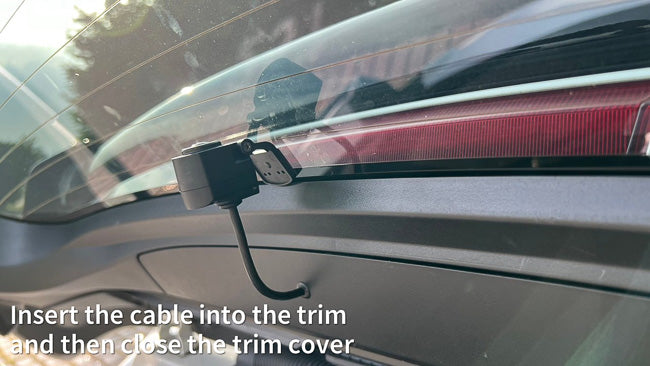
33_Reattach_Panel_Cover

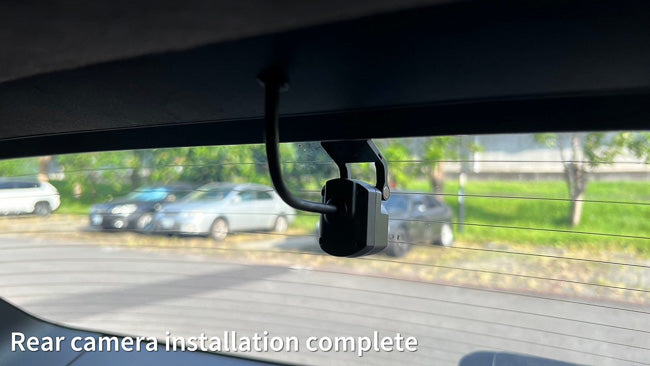
Step 32: Lastly, ensure the rear camera's recording angle is correct. With that, your rear dash cam installation is complete!
34_Rear_Camera_Installed

After going through this detailed guide on installing a rear dash cam, you might find it's not as hard as imagined! Apart from saving installation costs, doing it yourself offers a sense of accomplishment! 🤘🏻

If you still find the installation of the dash cam rear camera too complicated or are afraid of DIY, I suggest you consult trusted local automotive department stores, car audio shops, or service centers about hidden wiring installation for the dash cam rear camera. Each shop might have different charges, so it's recommended to call and inquire about their rates and check their reviews before proceeding with the installation. Moreover, our UltraDash R1 2K rear camera has an IP67 water and dust resistance rating. For those who prioritize clear image quality, it's recommended to install the dash cam rear camera outside the vehicle. However, the process is more intricate when installing it externally, so it's best to let professional service providers handle the rear camera installation.


🏆 2026 Dash Cam Buying Guide: Quick Summary of 4 Popular Models

In 2026, the core of choosing a dash cam has shifted to "True 4K" and "Function-Oriented (Telephoto/Commercial)". Here are the best recommendations tailored to different user needs:

Recommended For Recommended Model Core Highlight Rating
Flagship Enthusiast UltraDash Z4 (Dual 4K) Exclusive "Wide + Telephoto" dual lenses, license plates within 50m have nowhere to hide. ⭐⭐⭐⭐⭐
High-Standard Driver UltraDash Z3 Plus (Dual 2K) Star telephoto technology paired with a 2K rear camera expansion, offering the most balanced performance. ⭐⭐⭐⭐⭐
Night Vision Choice UltraDash A6 (4K) Sony Starvis 2 sensor, ultimate 4K night recording, and a stealthy design. ⭐⭐⭐⭐⭐
Professional Driver UltraDash Z4 Commercial (Dual 4K) Dual 4K lenses (exterior + interior wide), built-in IR night vision illumination. ⭐⭐⭐⭐⭐

As times progress, dash cams have become a new favorite for many drivers ❤️. This device not only records video and audio during your drive but can also serve as crucial evidence during an accident, protecting you from false accusations. However, with the dazzling array of options on the market, it's essential to do your research if you're unfamiliar with dash cams to ensure you choose one that fits your needs.

Ultimate 4K Flagship

The Ultimate Choice for 4K Quality & Complete Protection

Recommended Model: UltraDash Z4 Dual 4K Flagship Edition
Rating: ⭐⭐⭐⭐⭐

UltraDash Z4

UltraDash's 2026 masterpiece! Featuring a revolutionary dual-lens setup: a 140° wide-angle combined with a 50m telephoto lens, perfectly solving the "I can see it, but I can't read it" pain point. True 4K resolution across both lenses without interpolation! 😎

Learn More About UltraDash Z4 →
Top Forum Recommendation

For Users Seeking Clear License Plates & Rich Features

Recommended Model: UltraDash Z3 Plus Standard Edition
Rating: ⭐⭐⭐⭐⭐

UltraDash Z3+

Cansonic's star product! Exclusive telephoto technology captures distances up to 50 meters, clearly recording license plate evidence. Supports 2K rear camera expansion, offering ultimate video clarity and complete GPS/wireless functionality. 💪

Learn More About UltraDash Z3 Plus Standard Edition →
2026 Commercial Flagship

For Professional / Taxi Drivers Protecting Their Rights

Recommended Model: UltraDash Z4 Commercial Edition (Dual 4K)
Rating: ⭐⭐⭐⭐⭐

UltraDash Z4 Commercial

Tailor-made for professional drivers! The UltraDash Z4 Commercial Edition pushes image quality to its peak with two True 4K lenses. Additionally, it features powerful IR night vision illumination, capturing crisp black-and-white footage even in a pitch-black cabin. Highly recommended! 💪

Learn More About UltraDash Z4 Commercial Edition →
Commercial Use

For Commercial / Taxi Drivers Protecting Their Rights

Recommended Model: UltraDash Z3 Plus Commercial Edition
Rating: ⭐⭐⭐⭐⭐

UltraDash Z3+ Commercial

Designed for drivers, dual wide-angle lenses simultaneously record road and cabin conditions. Equipped with "Infrared Illuminators," it records clearly even in a completely dark cabin, protecting the rights of both driver and passenger! 💪

Learn More About Z3 Plus Commercial Edition →

Cautious Users Prioritizing Rear Safety

Recommended Model: UltraDash AR2 Rear Camera
Rating: ⭐⭐⭐⭐⭐

UltraDash AR2 2K Waterproof Rear Camera

2K HDR resolution paired with an IP67 waterproof rating provides the strongest rear defense whether mounted inside or outside the vehicle. Eliminates the difficulty of providing evidence when rear-ended! 👊

Learn More About AR2 2K Waterproof Rear Camera →

Car Enthusiasts

Recommended Model: UltraDash HW1 Hardwire Kit Series
Rating: ⭐⭐⭐⭐⭐

UltraDash HW1 Hardwire Kit

Features powerful customizable low-voltage protection, making it the best partner for enabling "Parking Mode". Exclusive dual-output capability allows one hardwire kit to power both front and rear devices! Uninterrupted recording for double the peace of mind. 🤩

Learn More About UltraDash HW1 Hardwire Kit Series →

Wow! We accidentally recommended too many dash cams and accessories, all because Taiwanese brand UltraDash's products are just too excellent 🤩.

We hope you read this article carefully before purchasing your dash cam. Everyone's needs are different, so finding the dash cam that best suits your specific requirements is what we recommend most 😘.

Learn more now: UltraDash Dash Cam Official Website

Further Reading

HDR vs. Non-HDR Dash Cam: Does HDR Really Help at Night?

2026.09.10

HDR vs. Non-HDR Dash Cam: Does HDR Really Help at Night?

HDR is one of the most common features advertised on modern dash cams. The promise sounds straightforward: better...
Why Your 4K Dash Cam Still Can't Read License Plates Clearly

2026.09.10

Why Your 4K Dash Cam Still Can't Read License Plates Clearly

Buying a 4K dash cam sounds simple: more pixels should mean more detail. But many drivers are surprised when they r...
Best Dash Cam for Highway Driving: What Matters at 60–80 MPH?

2026.09.10

Best Dash Cam for Highway Driving: What Matters at 60–80 MPH?

Quick Answer: For highway driving, look beyond a wide field of view. Vehicles are often farther away, relative sp...
How Important Is HDR for a Dash Cam? UltraDash Z4 4K HDR & 50m Telephoto VS Regular 4K Dash Cam Road Test

2026.09.07

How Important Is HDR for a Dash Cam? UltraDash Z4 4K HDR & 50m Telephoto VS Regular 4K Dash Cam Road Test

🔍 How Important Is HDR for a Dash Cam? Regular 4K Dash Cam VS UltraDash Z4 Real-World Road Test with Sony STARVIS 2...
Best Dash Cam for Hit-and-Run Evidence: What Features Actually Matter?

2026.09.04

Best Dash Cam for Hit-and-Run Evidence: What Features Actually Matter?

Quick Answer: For hit-and-run evidence, prioritize a camera that records the entire event clearly while also pres...
4K vs. 1080P Dash Cam: UltraDash Z4 Real-World Comparison with Wide-Angle and 50-Meter Telephoto Footage

2026.09.03

4K vs. 1080P Dash Cam: UltraDash Z4 Real-World Comparison with Wide-Angle and 50-Meter Telephoto Footage

When an accident happens, the most important job of a dash cam is not simply to prove that something was recorded. ...
Telephoto vs. Wide-Angle Dash Cam: Which Is Better for License Plates?

2026.09.03

Telephoto vs. Wide-Angle Dash Cam: Which Is Better for License Plates?

Quick Answer: A telephoto dash cam is worth considering if you often want more detail from vehicles several car le...
Is a 4K + 4K Dual Dash Cam Worth It? What You Gain - and What to Consider

2026.09.03

Is a 4K + 4K Dual Dash Cam Worth It? What You Gain - and What to Consider

Quick Answer: Dual 4K matters most when both cameras are expected to capture fine detail. If the second camera is o...
taxi uber lyft park on the roadside

2026.04.15

Five Key Points of Choosing a Dash cam for Taxi and Ridesharing Drivers [2026 Updated]

📝 English Summary (Quick Read / Executive Summary) The Ultimate Guide to Choosing a Dashcam for Rideshare Drivers For...
Older Post
Newer Post
UltraDash Z4
UltraDash Z4 Dual 4K Dash Cam 140° Wide Angle | 50m Telephoto
Back to top

Shopping Cart

Your cart is currently empty

Shop now